Introducing uv: A Fast, Portable Python Environment Manager

Introducing uv: A Fast, Portable Python Environment Manager
These blog posts are intended to provide software tips, concepts, and tools geared towards helping you achieve your goals. Views expressed in the content belong to the content creators and not the organization, its affiliates, or employees. If you have any questions or suggestions for blog posts, please don’t hesitate to reach out!
Introduction
Managing Python environments has evolved rapidly over the last decade, but complexity and portability remain challenges.
uv from Astral aims to simplify environment management with exceptional speed, cross-platform portability, and complete feature parity with existing tools.
In this article, we’ll explore the history of Python environment management, consider conda in context with Python ecosystems, and provide an overview of using uv.
What is uv and why does it matter?
uv is a Python environment management and packaging tool which helps you write and maintain Python software.
In context with other similar tools uv is magnitudes faster at completing the same work.
This is due largely to Rust bindings which help the Python-focused procedures complete more quickly and a custom dependency resolver (which often consumes large amounts of time).
In the following paragraphs we’ll cover some background on this area to help provide context about uv and the domain it assists with.
What are Python packages and environment management?
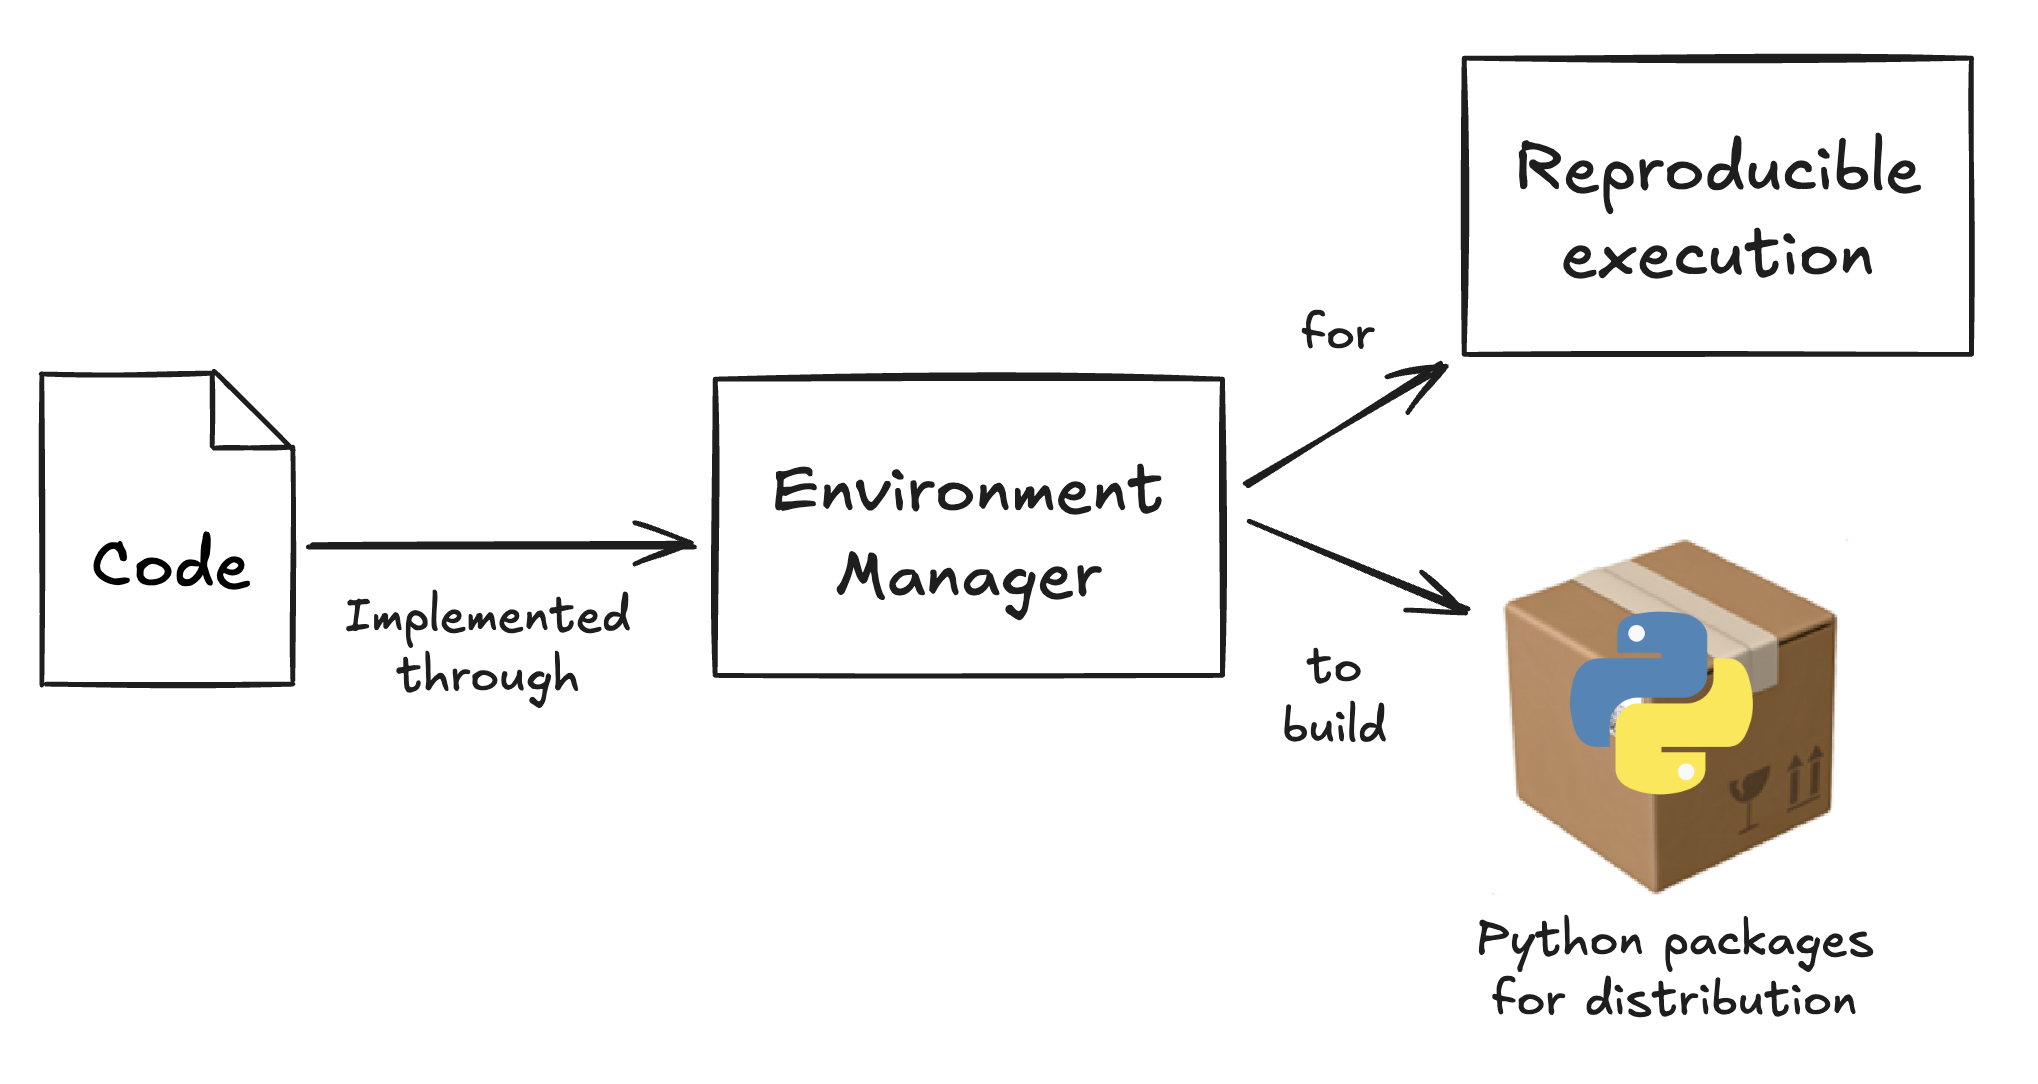
Python packages are the primary way you can install and import pre-existing code into your projects (without needing to copy the code into your own project directly). Python environments include all the necessary details (including external package dependencies) to help ensure your projects work through reproducible execution. Python environment management tools are used to help add, remove, or update external package dependencies. They also help you build packages of your own for deployment to others.
Without environment management tools and their related code you will be unable to accurately reproduce your Python environment. This can lead to challenges when it comes to reproducibility (you may see different outcomes or exceptions from system to system). It also can be costly in terms of time (dependency management alone can cause hours of debugging time). Using environment managers with Python is nearly required at this point in time.
A brief history of Python environment management
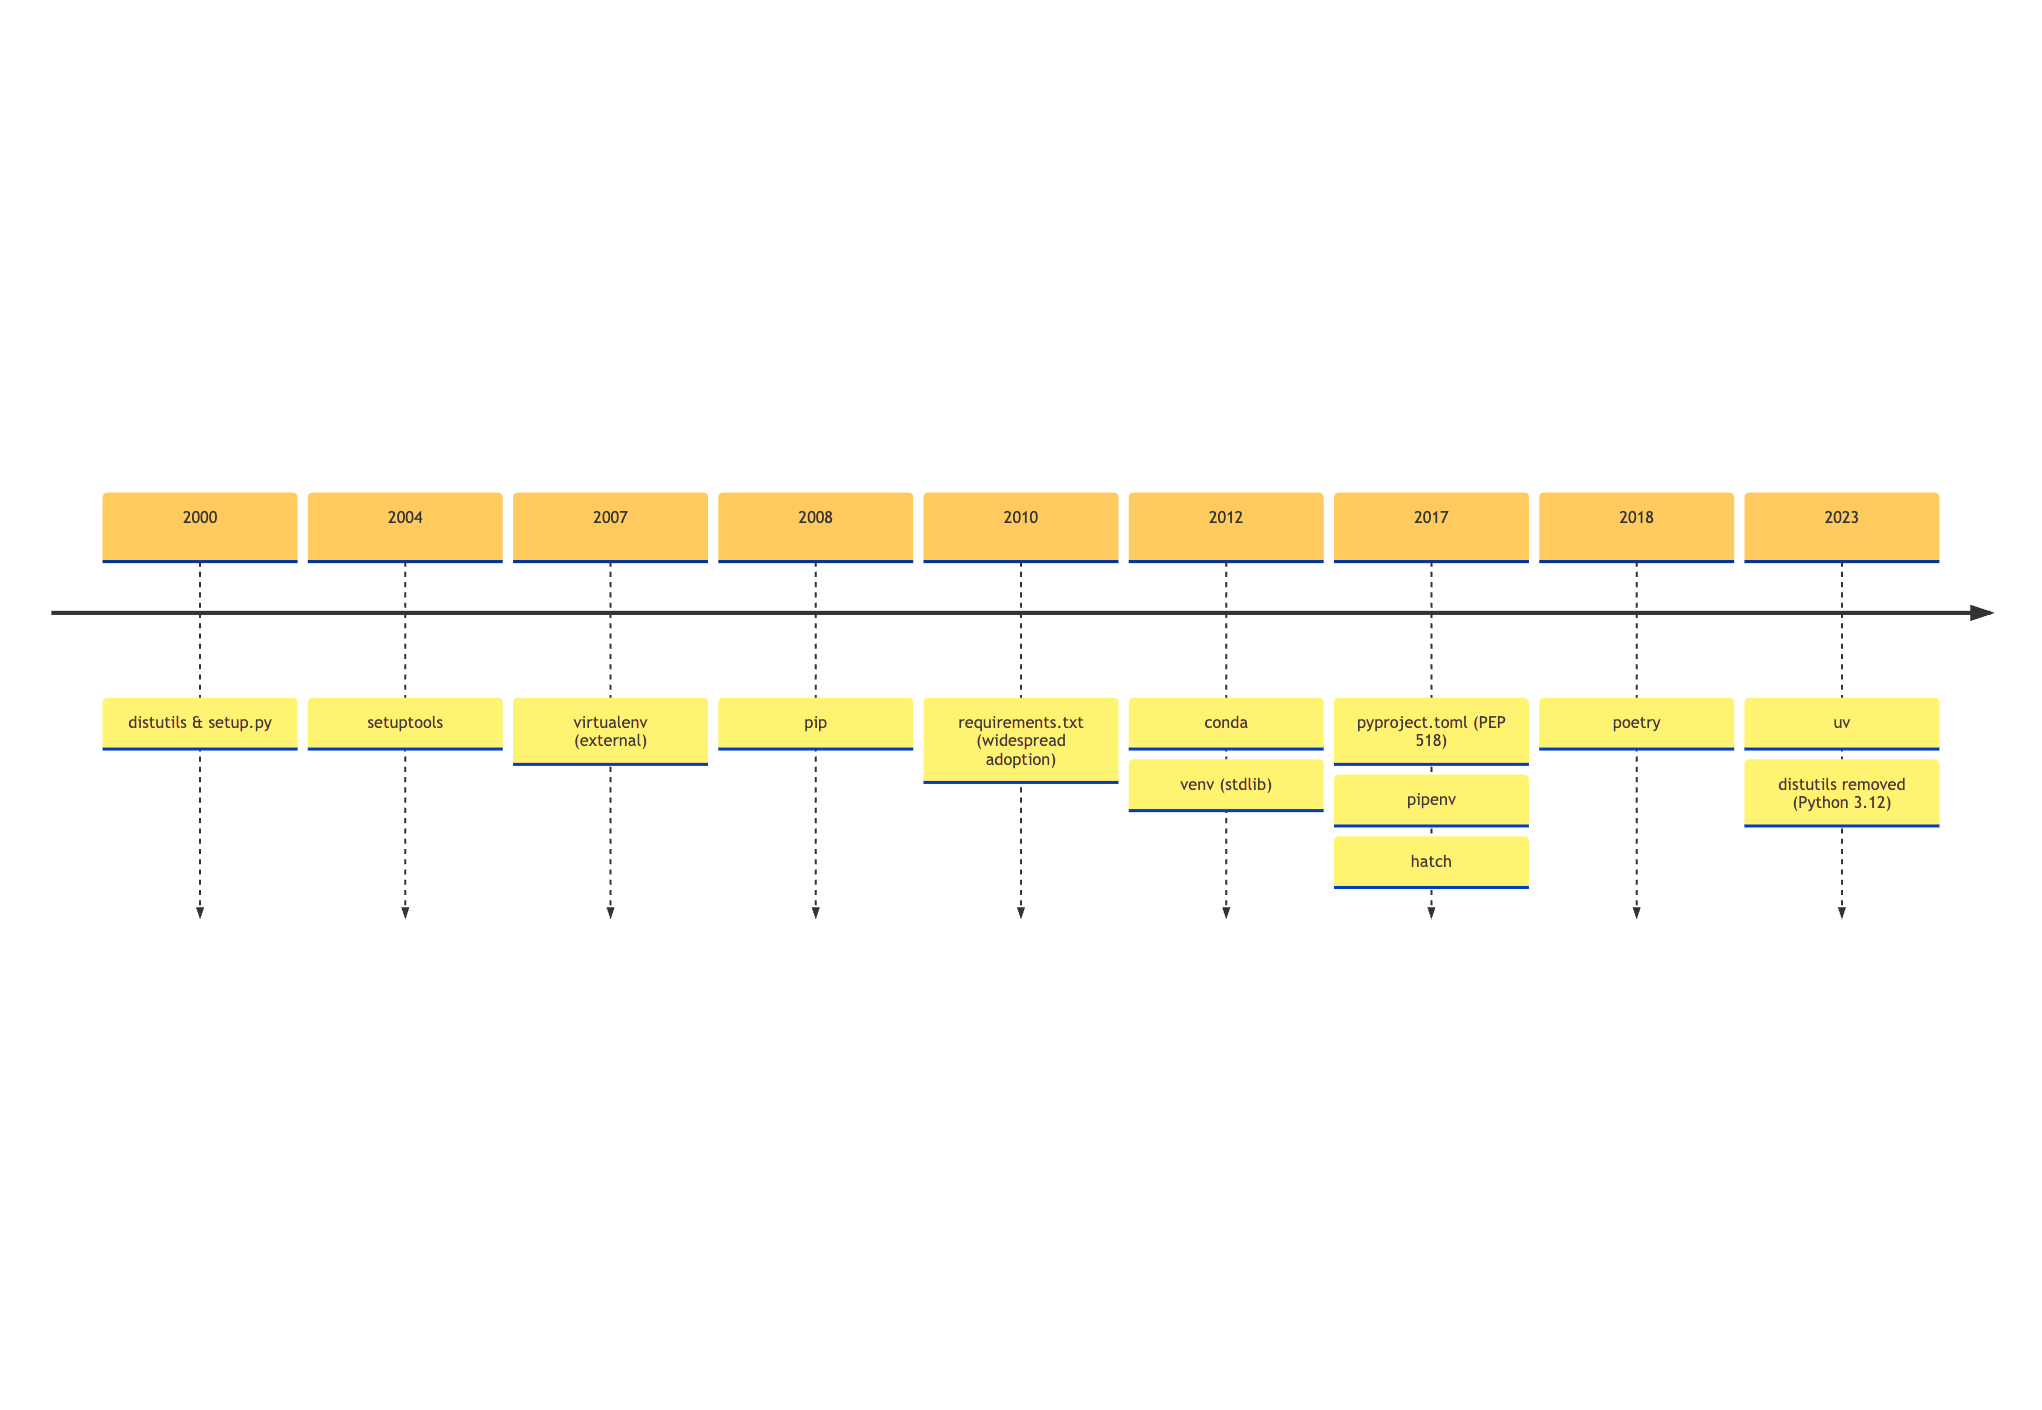
Python environment management has drastically changed since the year 2000.
We provide the below timeline synopsis of some of the bigger changes to this domain for Python.
Keep in mind that many of these tools are still supported today but some are deprecated and or in the process of being removed (such as distutils, which was removed from Python 3.12 and future versions).
-
2000:
distutils&setup.py -
2004:
setuptools-
setuptoolsis an enhanced library building ondistutilsthat introduced additional features like dependency management, easy installation, and entry points, becoming the de facto standard for Python packaging.
-
-
2007:
virtualenv(external)-
virtualenvis a third-party tool to create isolated Python environments, preventing conflicts between project dependencies by isolating them per project.
-
-
2008:
pip-
pipis a package installer for Python that greatly simplified the process of installing and managing Python packages from the Python Package Index (PyPI).
-
-
2010:
requirements.txt(widespread adoption)- The
requirements.txtfile is a plain text file format listing project dependencies, which became a standard way to specify and share the exact package versions needed for a Python project.
- The
-
2012:
conda-
condais a cross-platform package and environment manager popular especially in the scientific Python community, able to manage non-Python dependencies as well.
2012:
venv(stdlib)- The inclusion of
venvin Python’s standard library to create lightweight virtual environments without requiring external tools.
-
-
2017:
pyproject.toml(PEP 518)- A new configuration file standard called
pyproject.toml(PEP 518) aimed at improving and standardizing Python project build metadata, allowing tools to declare build dependencies.
2017:
pipenv-
pipenvis a tool combining package management and virtual environment management in one, focusing on ease of use and reproducible environments.
2017:
hatch-
hatchis a modern project manager and build tool focusing on simplicity, speed, and support for multiple Python versions and environments.
- A new configuration file standard called
-
2018:
poetry-
poetryis a comprehensive packaging and dependency management tool that usespyproject.toml, aiming to simplify dependency resolution and publishing.
-
-
2023:
uv-
uvis a newer tool in the ecosystem (likely referring to a fast build or packaging tool, or a modern environment manager) reflecting ongoing innovation in Python packaging and environment management.
-
Where are packages hosted?
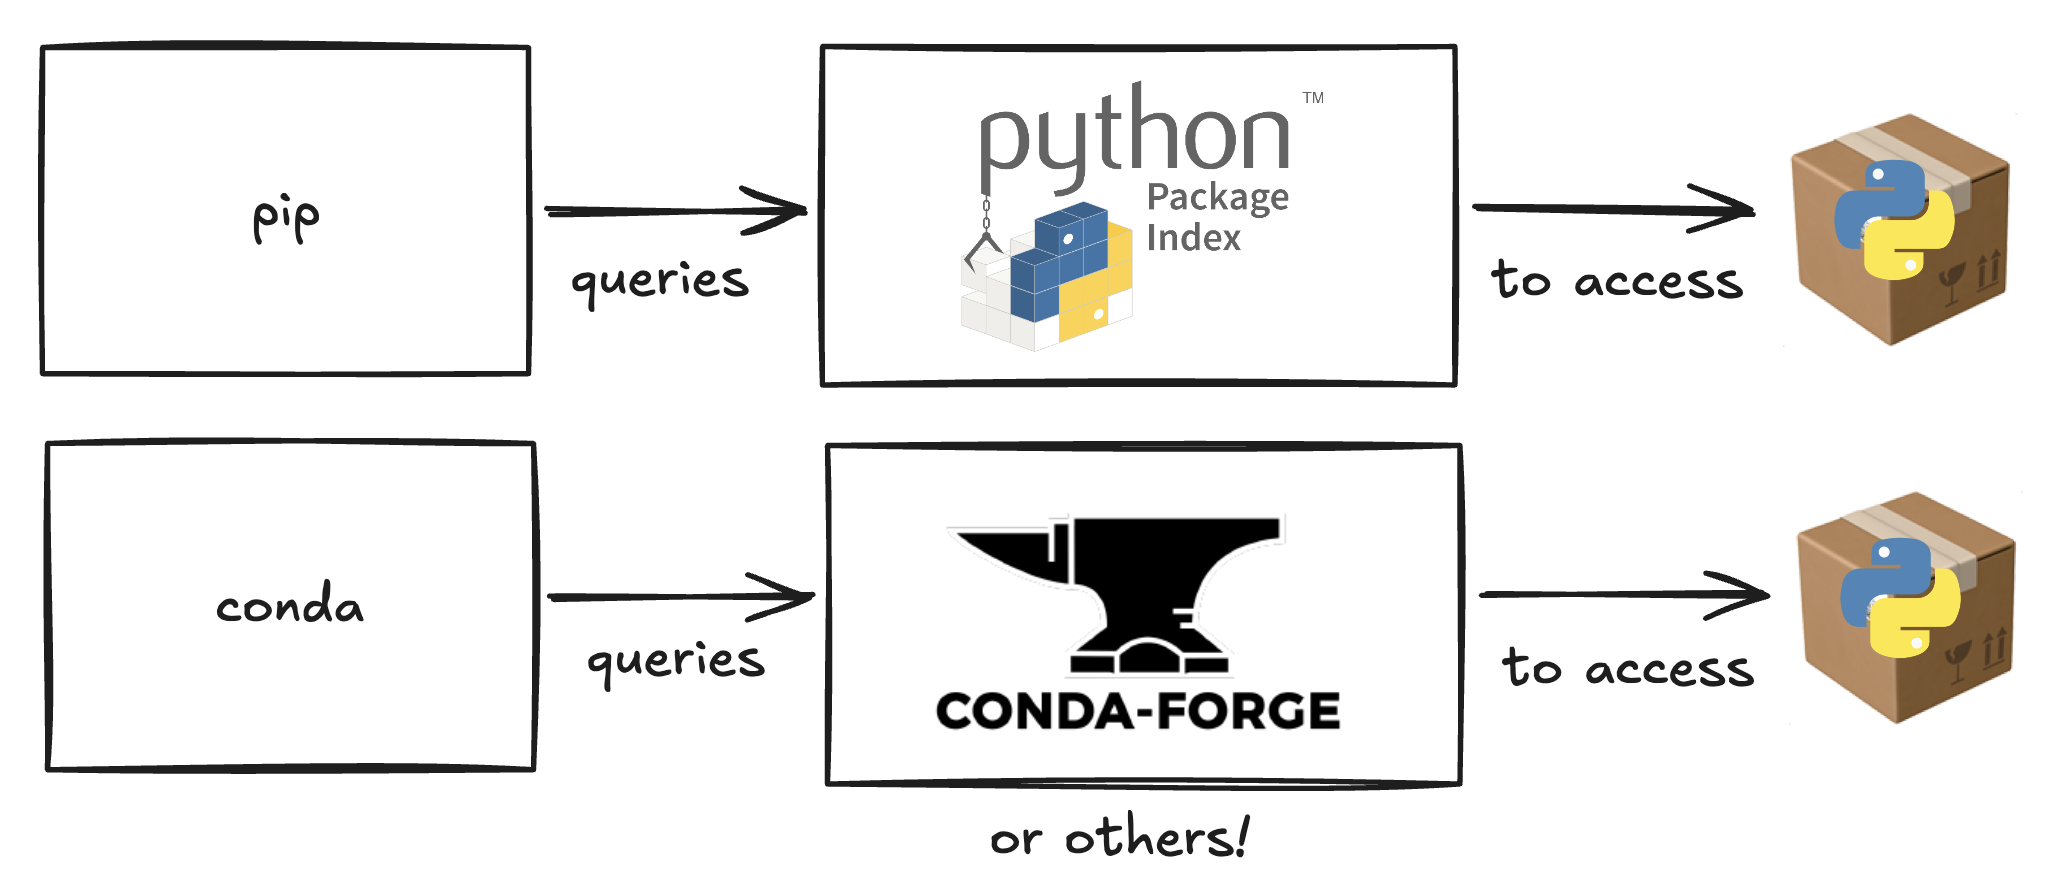
Python’s packaging ecosystem mainly revolves mostly around PyPI and Conda.
PyPI is the official repository for Python packages and is accessed through pip.
It handles pure Python packages well but struggles with packages that require non-Python dependencies or system libraries, which can make installation tricky across different platforms.
Conda is a package and environment manager that supports both Python and non-Python packages, making it popular in data science and scientific computing. It simplifies managing complex dependencies but can be slower and sometimes inconsistent due to multiple package channels. Choosing between PyPI and Conda often depends on whether you need pure Python packages or a more complete environment with system-level libraries.

Using PyPI and Conda together can be challenging because they manage packages and dependencies differently, which can lead to conflicts and unpredictable behavior.
Conda packages often bundle compiled libraries with carefully managed build strings, whereas pip installs only Python wheels or source distributions and isn’t aware of Conda’s binary packages.
If you install a library with pip after creating a Conda environment, pip may overwrite a Conda‐provided binary (or install a version Conda doesn’t know about), leading to mismatches.
Intermixing dependencies also may involve multiple package manager CLIs (e.g. conda and pip) which can introduce challenges with troubleshooting (each have distinct sub-commands and flags).
This complexity often forces developers to carefully manage and isolate environments or choose one system over the other to avoid issues.

A common approach in Python packaging is to first develop and release a package to PyPI, where it can be easily shared and installed using pip. Once the package is stable and widely used, it may be packaged for Conda—often via the community-maintained conda-forge channel—to support users who rely on Conda environments, especially in scientific computing. This pipeline allows developers to reach the broadest audience while maintaining compatibility with both ecosystems.
How are Python packages distributed?
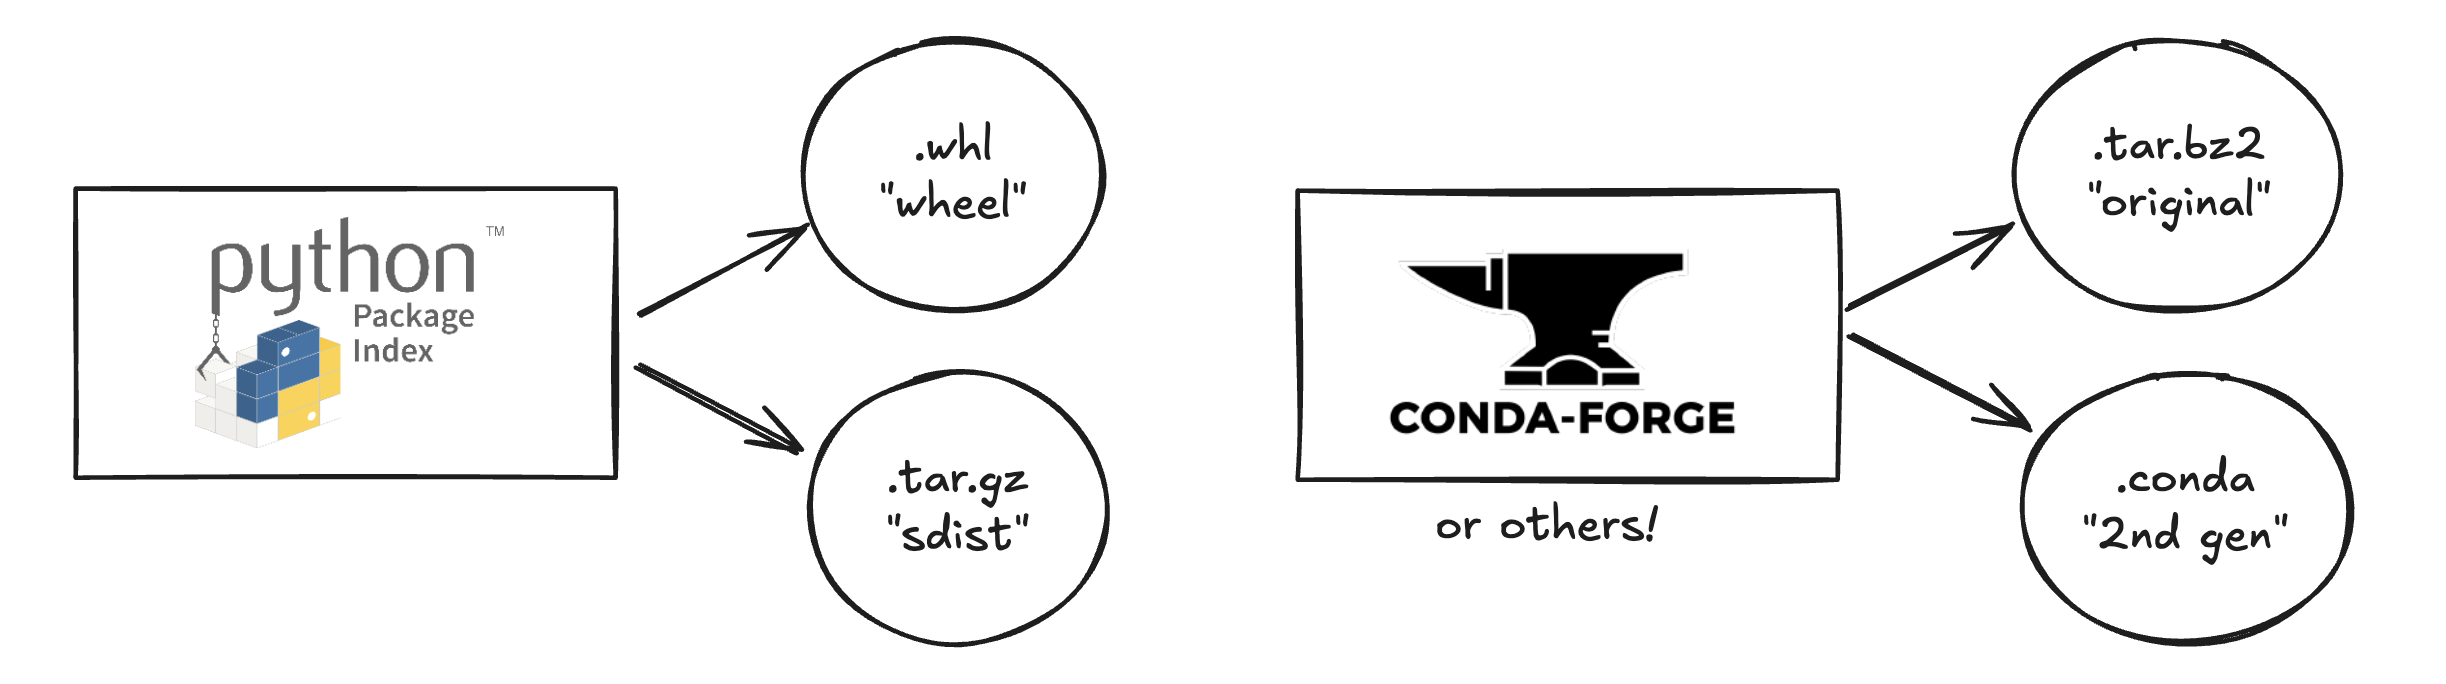
In Python packaging, package distributions are the artifacts that users download and install to use a Python project—most commonly as .whl (wheel) or .tar.gz (source distribution) files.
A wheel is a pre-built, binary package format (.whl) designed for fast installation without needing to compile code (note: a .whl is really a .zip so you can unzip it to take a look at the contents).
Wheels are specific to each operating system type and may include already-compiled extensions from other languages.
Wheels are the preferred format for most users and is what tools like pip look for first on PyPI.
In contrast, a source distribution (.tar.gz, often called an sdist) contains the raw source code and build instructions; installing from it may require compiling extensions written in other languages, e.g. C, C++, or Rust or resolving more complex dependencies.
Source distributions are essential for reproducibility, auditing, and as a fallback when no wheel is available for the user’s platform.
Conda packages, on the other hand, belong to a separate ecosystem built around the Conda package manager. A Conda package is a .tar.bz2 or .conda archive that includes not just Python code, but also compiled binaries and system-level dependencies.
This makes Conda particularly useful for scientific computing, where packages often require compiled C/C++/Fortran libraries.
Unlike wheels, Conda packages are not tied to Python’s internal packaging standards - they’re built using Conda-specific metadata and managed by Conda environments.
While PyPI and pip dominate general-purpose Python packaging, the Conda ecosystem provides a more holistic, environment-based approach—at the cost of being somewhat siloed and less compatible with pure Python tools.
These files are typically uploaded using specific application programming interfaces (APIs) to PyPI, conda-forge, or other similar locations.
uv overview

Below we’ll provide a quick overview of using uv to accomplish various environment management and packaging tasks.
Installing
curl -LsSf https://astral.sh/uv/install.sh | sh
uv can be installed using a curl reference to a script for your local system.
Afterwards, uv becomes a CLI command you may use through your terminal session.
See the installation documentation for more information.
Intitializing a project
# create a dir for the project and cd into it
mkdir project_name && cd project_name
# initialize a uv project within the dir
uv init --package
uv provides a nice initializer which can give you boilerplate files to work from.
We suggest using the --package structure which helps you create a Pythonic package and uses best practices.
Afterwards, the structure will look like the following:
tree ./
# tree output
./
├── pyproject.toml
├── README.md
└── src
    └── project_name
        └── __init__.py

3 directories, 3 files
Let’s break down this file structure so we know what we’re working with:
-
pyproject.toml: This file includes project metadata, configuration data, and (eventually) package dependency specifications. -
README.md: This file is often used to help introduce projects and talk about the “what”, “why”, and “how” at a high level. It helps users get acquainted with what the project focuses on. -
src: This directory is becoming standard practice for all source code within Python projects. It helps distinguish from documentation and “non-production” code. -
src/project_name: This directory is typically used to house a Python “package” (or a collection of Python modules, a.k.a.pyfiles). -
src/project_name/__init__.py: This optional file is used to help initialize a Python project when it’s imported. It typically will include imports to specific public-facing Python objects you wish to share through the work. It also may configure the project.
Adding dependencies with uv
# add a dependency to the project
uv add cowsay

# add a dependency to a "dev" dependency group for the project
uv add pytest --group dev
We can add external dependencies to the project using the uv add command.
uv enables you to leverage dependency groups which are a way to distinguish between “production” dependencies and “development” dependencies.
For example, we might want to include pytest for software testing during development of the project so we could add it to the dev group (we likely won’t need pytest for the production code).
This helps keep the production dependencies light by only including the necessary packages if someone uses non-development work from the project.
Using uv add (or similarly, uv sync, which updates the environment) also automatically creates a uv.lock lockfile, which is important for consistent environment mangement.
Lockfiles and reproducibility

Many modern Python environment managers automatically make use of lockfiles.
Lockfiles capture the exact dependency graph and package versions, ensuring that environments can be recreated byte-for-byte.
Be sure to check out our in-depth blog post on lockfiles for more information.
uv generates a uv.lock file automatically, giving you:
- Deterministic installs: No surprises when sharing environments.
- Auditability: Pinpoint which package versions are in use.
- Collaboration: Team members and CI pipelines use the same environment.
PEP 751 introduces some standardization for Python lockfiles (pylock.toml) but many tools have not yet adopted this standard.
uv’s lockfile data cannot yet be fully expressed in pylock.toml files and as a result it still depends on uv.lock files.
It’s like that the Python standard for lockfiles will evolve over time and could eventually converge (meaning you’d be able to use multiple tools with the same lockfile).
Processing code through uv environments
# run the boilerplate code through the uv environment
# note: the `python -c` command flag executes inline code.
uv run python -c "import project_name; project_name.main()"

# run pytest through the uv environment
uv run pytest
When we want to process code through the uv environment we can use the uv run command.
If you’re used to using conda environments this is akin to conda run -n env_name python.
Note: uv does not enable you to activate or “enter into” an implicit shell for the environement like conda activate.
Instead, uv uses declarative syntax to ensure the command-line interface (CLI) to the environment is explicit.
When working with other projects you might also need to run an install command in order to have access to the environment.
uv skips this step and automatically will install the environment on issuing a uv run (there is no uv install command).
When we use uv run several things happen:
-
uvwill attempt to fetch a system or remote version of Python as stipulated in thepyproject.tomlfile (or make a guess at a version of Python to use). -
uvwill install or update an ephemeral virtual environment under a~/.venvdirectory (and use this environment to execute the process).
Building Python packages for distribution
# build a package for distribution
uv build
uv provides a build system which enables you to build packages for distribution through the command uv build.
By default it creates Pythonic .whl and .tar.gz formats that are common to PyPI.
Note that you still have to upload these through other means in order for them to be hosted on common platforms like PyPI.
We recommend using the Trusted Publisher method for publishing your packages once readied, which takes advantage of GitHub Actions or similar continuous integration / continuous deployment (CI/CD) tooling.
[build-system]
build-backend = "setuptools.build_meta"
requires = [ "setuptools>=64", "setuptools-scm>=8" ]
Note that you can change your build backends within the pyproject.toml configuration (instead of using uv-build by default).
For example, if you wanted to use setuptools you could stipulate something like the above in your pyproject.toml file instead.
This can assist with areas where you may like to use dynamic versioning for your work through projects like setuptools-scm.
Migrating existing environments to uv
Reading this, are you thinking you might want to move your project environment management to uv but sweating the idea that it will be complicated?
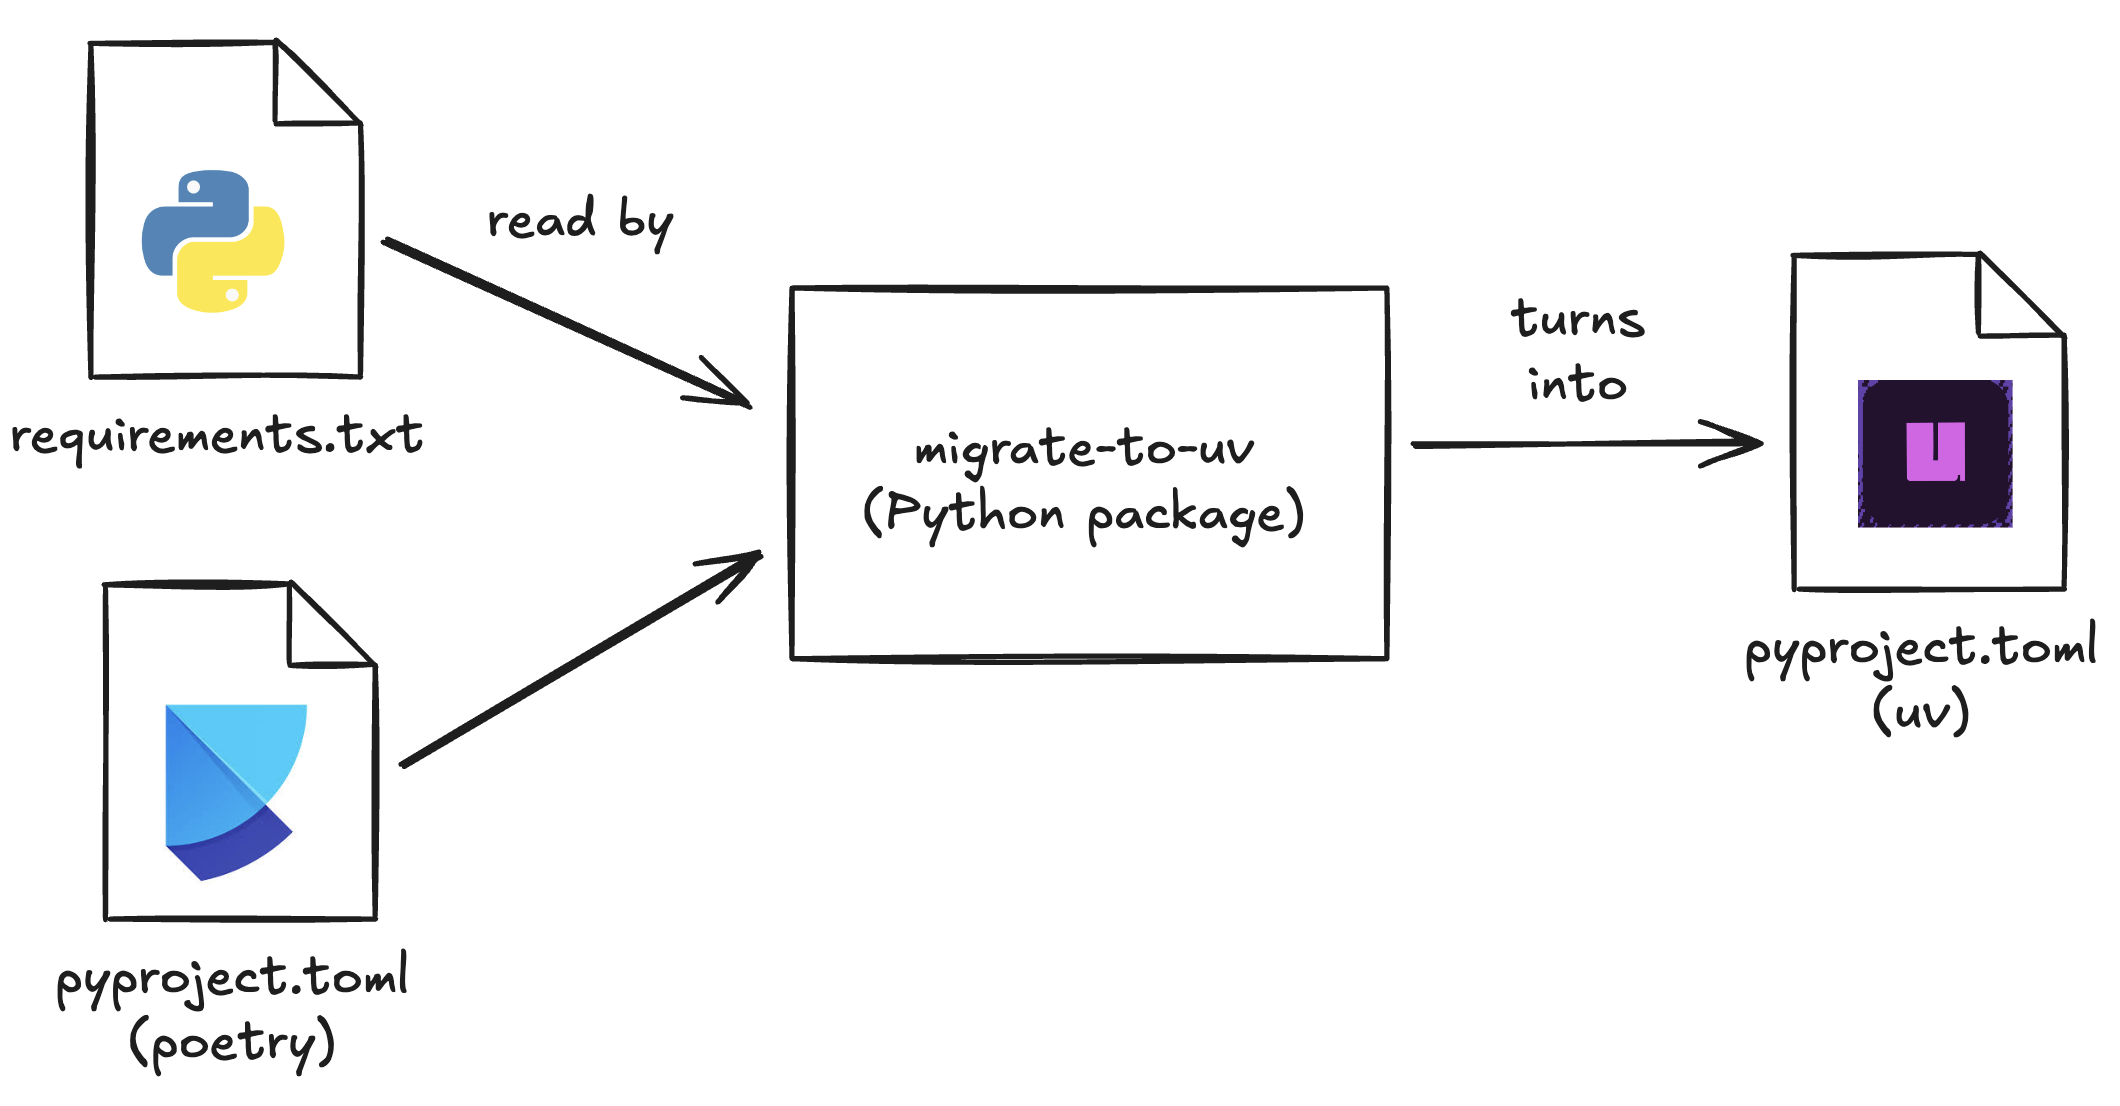
For users looking to migrate existing environments to uv, tools like migrate-to-uv provide a transition path by converting existing requirements.txt or, for example, Poetry-based pyproject.toml files.
This can provide a streamlined and low-cost way to transition projects over to uv.
A uv template for new projects
If you’re interested to use uv and would like to start through a template consider using template-uv-python-research-software.
This project is a copier template that lets you quickly get started with uv and other boilerplate files for a Python research software project (including Jupyter notebook support).
Please see the documentation of the project for more information on what’s included in the template.
For example, you can use the following commands to use this template:
# install copier
pip install copier

# use the template to create a new copy
# where "new_project" is a new directory which
# will include the template copy files.
copier copy https://github.com/CU-DBMI/template-uv-python-research-software new_project
Conclusion
“The best tool is the one you don’t have to think about using.” - common adage
uv from Astral offers research software engineers a fast, portable, and standards‑compliant environment manager that meets or exceeds the capabilities of existing tools.
By leveraging native Python packaging, robust lockfiles, and seamless Jupyter support, uv simplifies reproducible workflows and accelerates development.